This blog was writing in 2010 when I received a Fund For Teachers Grant and used it to make paper.

Welcome to Paper Stars, a journal designed to document and celebrate my experiences with making paper. I am the science specialist at the Lee Academy Pilot School, a K0-Grade 5 Boston Public School  in Dorchester, MA. Certified to teach art as well as science at a K-8 level, I am interested in designing experiences in the classroom that cultivate skills used in making art, understanding and designing technology, and studying science. Those skills include but are not limited to observation, dexterity and the ability to use tools, collaboration and teamwork, and the ability to communicate one’s ideas to others.

Thanks to a generous fellowship from Fund For Teachers, I will be attending three paper making workshops at the Women’s Studio Workshop in Rosendale NY starting July 19. It is my hope to take my experiences as a student of paper making and design curriculum for my students.

Inspired by curriculum I teach at a kindergarten level about paper and wood from the eponymous FOSS Kit, I have developed a strong curiosity for how paper is made and wonder what kinds of paper we can make in our science classroom. So many things we use in everyday life are made of paper and paper is made from so many different materials.

This year in the science room kindergarten students made paper stars by reusing the paper from the tops of egg cartons. We called our room “the factory” when we were in production. Students worked together to rip the paper, mix it with water and blend it into a slurry, shape the paper using screens with star stencils, press the excess water out, lay them out to dry and then paint the stars. The paper stars were then presented to our graduating fifth grade class.

I was particularly impressed by the developmental appropriateness paper making offers students in elementary school. Seeing 5 year olds rip paper and then blend it, shape it, carefully place it to dry and then paint it promotes an ethic of excellence and dexterity. Addressing differentiation, there are many different jobs that members of the group can take part in – some more exacting and complex than others.

My hope is that the tradition of making paper stars for the graduating class will evolve and gain more student ownership in the future. Perhaps other grades will make the stars and there may be a theme or particular material they use.

I see great potential but first I must be the student. I am excited to embark upon this learning adventure and nurture my own artistic talents while employing the scientific method and process of technology to make paper of my own.

So stay tuned and see how this project develops!

donning my paper star I set out in my rented car with my bike blender.

With rented car and bike blender I set out on a 4 hour drive to Rosendale New York, home of the Women’s Studio Workshop. The drive was beautiful – especially along the Taconic Parkway.

From Paper to Print started with introductions and a survey of paper pieces made using various techniques.

I completed Gretchen Schermehorn’s workshop, ”From Paper to Print” yesterday and as I thumb through the papers I made and scroll through the photos I took and reflect on all the new sensations and thoughts I have, I appreciate how much I gained and grew this past week.

Did you know you can make paper from old t-shirts and towels or an iris or even a cucumber?! We made paper out of all of these things and used several techniques to produce many different works. On our first day we prepared raw materials for making paper – worked as a sort of deconstructing quilting bee – six women sifting through a mound of cotton and linen scraps pulling the white bits and red bits out to collect ¾ pounds of each color to make two distinct batched of rag paper pulp. We pulled and ripped sheets and towel into 1 inch squares and then put them into a beater – a machine that beats the bits until they break down – pulp can be beaten for several hours in order to get the right consistency –

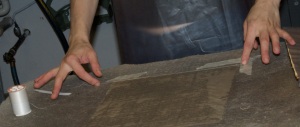
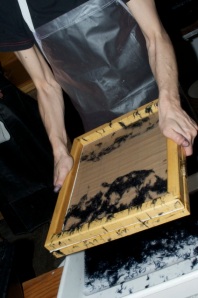
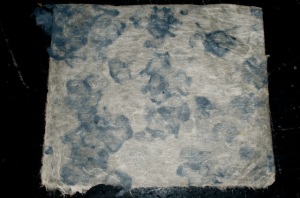
After lunch on Monday I pulled my first piece of paper ever – Vats are filled with water and the soupy pulp.  A screen with a frame called a deckle is dipped into the slurry and lifted up. With a gentle lateral shake in a few directions, the water drains out, the deckle is lifted off and the soggy pulp is ready to be “couched” or “laid down” onto a moist fabric. Throughout the week we had several kinds of pulp in different vats around the studio and as the options grew so did the activity and excitement in the studio. We learned how to double couch and then place objects between layers, we learned how to add pigment to pulp and how to print with paper pulp using a stencil.

Once the sheets are pulled and sandwiched between layers of fabric, they are pressed in a 20-ton presser that squeezes out water. Then the wet paper is transferred delicately to blotters and placed in a drying box for several hours. Seeing the first sheets I made was very exciting.

On Tuesday afternoon the class graciously entertained a side project I proposed. I brought a bike blender I plan to use with my students in our science class. Cassandra Gibbs, a graduate of MIT made the blender at my request and I decided to bring it with me to see how it could work. After Woody, resident builder and repair guru fixed a broken pedal, we put a chunk of half-beaten abaca into the blender and several people took turns pedaling the blades around. It worked and I had enough pulp to pour two sheets of paper. Later in the week I chose to print a photo of me on the bike blender, onto that very paper.

As the week progessed ( and flew I might add) experimentation turned into ideas for pieces and I worked most evenings til 11 pm as the studio was available for our use. While I had access to materials and machines I do not have at my disposal in my science room, I was constantly looking for ways to bring some of what I am experiencing back to my students. I believe at this point many of these new experiences will find their way into my practice in ways I can not yet imagine but I think our paper stars will certainly evolve over time.

Next week begins another workshop with Tatiana Ginsberg called. “Paper + Dye, Japanese Papermaking and Natural Colors”. I anticipate another explosive week of learning and being creative and productive.

THANKS FUND FOR TEACHERS – I’m having a ball! I found it difficult to edit and upload all my photos so I kept them in a series of informal galleries that can be found: http://gallery.me.com/bngates#101608

http://gallery.me.com/bngates#101600

http://gallery.me.com/bngates#101616

Today was like no other day I have lived – I spent several hours preparing kozo for Japanese paper making. Kozo is the japanese word for a kind of mulberry use in paper making. I was interested to learn that paper-making came to Japan first by Korea and foremost to provide a worthy platform for Buddhist texts. I also learned that paper was dyed for two reasons: using color was a gesture to humble one’s craft and the pigments also served as a way to temper degradation by insects. Customarily, in Japan paper was made by farmers in the winter when outdoor work was limited. raw kozoThe kozo tree is cut down when it is one year old; the tree with continue to grow from the cut to provide a new 1-year sapling in the future. The dead wood in the center is discarded , the outside bark is stripped and it is the clean cambium layer used for the paper fiber. Tatiana, our instructor did two necessary steps in advance to move our limited time along.

She soaked and cooked the fiber in an alkali solution for 2.5 hours and let it coolovernight. We then rinsed the cooked kozo three times using a net and several buckets of water and proceeded to use tweezers to pick clean the bits of dark bark and other imperfections clinging to both the inside and outside of the kozo. I noticed that the more invested I became in this process, the more appreciation I felt for Japanese paper.

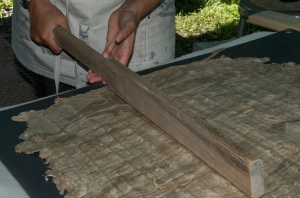
After we cleaned the chiri (imperfections) from the kozo, we squeezed out excess water and laid the kozo out on a board in preparation for beating – a process that separates the strands of fiber laterally. We use what looked like a cricket bat and let gravity take it to the kozo making a loud thwap sound and causing a dent in the kozo. Once the “bat” lands, one drags it down to promote pulling the strands apart. Today we started beating – tomorrow we continue beating…

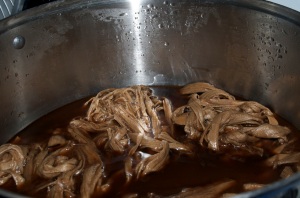
Another unique day distinguished by preparing kozo for paper and dye. We started by ripping lotus leaves into a pot to simmer – Lotus yields a yellow dye.

I learned that you can dye paper in several ways with many different natural things and that dyes have a loaded history. Forbidden colors like red and purple were reserved for royalty due to the quantity of material needed to make highly saturated hues. “Blue collar” stems from the common access to blue dye – something shared in the global community. – so much to think about and appreciate – I now want to learn more about how the Redcoats got their red coats.

One can dye pulp before sheets are formed, one can dye formed sheets by dipping the sheet into a bath of dye and one can paint dye on paper with a brush. One can also dye formed sheets and then turn the paper back into pulp and form new sheets.

Dye can be made from different parts of plants. Sometimes a plant with a simple white flower can have a root that gives up a deep dark purple. Insects are used in dyes. Parts of nuts and cones can be used. Skins of pomegranate  can be used. I look forward to experimenting with things I find in the woods.

We pulled the partially beaten kozo from the refrigerator and commenced the beating process using our cricket bats. The kozo’s texture changed ever so subtly from more stringy to more doughy with each successive blow.

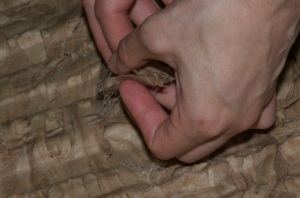
There is a test one does to see how the fibers are behaving – letting you know if more beating is necessary. You pull a small piece of the moist kozo -put it in water, shake it and watch how the fibers disperse- that helps inform you how it will behave in the vat. If fibers seem to be clumped together then more beating is in order – After our tests we needed more beating. Blisters, gloves, wondering what kinds of song the women who traditionally did/do this sing to scaffold the rhythm of the beating. Aware of gravity taking the bat down – it is the lift that causes muscle soreness – As the beating progresses, water is introduced to the kozo and a mallet with points like a meat tenderizer can further beat the pulp.

We divided the kozo into parts – planning to dye some with our lotus yellow, keeping some white and putting some aside for tomorrow’s dyes.

The dyeing process involves first rinsing the beaten kozo, then submerging it in dye  for a timed interval – ours was 25 minutes. Then a soak in mordant – (meaning to bite) The mordant is a chemical compound, usually a metal, used to fix the dye and in the process can also alter the color slightly. We used a alum dissolved in hot water. The dyed kozo sits in the mordant for time equal in length to the dye soak. Then the kozo is rinsed and put back in the dye. I know it only took 300 words to describe today’s activities but it took seven people 6 hours to accomplish all this.

This paper we are making is very precious – very labor intensive – full of meaning and a result of working in community. Tatiana showed us slides from her travels in Japan. Paper is very important in Japan and used in many festivals both religious and secular. There are paper makers who are considered National LIving Treasures.  In one prefecture ( a prefecture is a distinct jurisdiction  – like a state – there are 47 in Japan) there is a school where students make their own diploma when they graduate – paper and all! I’d like to guide my 5th grade student through some process of making their own diplomas.

Tomorrow we will dye more kozo and start forming sheets.

Tatiana started the day by announcing, “Today we will make paper…not that we haven’t been with all our preparations. Some say making sheets is the showy part.”

Making paper from kozo which has much longer fiber strands than abcaca or flax or cotton used in western style papers, requires a different action with the mould and a different mould for that matter. One layers the pulp with kozo – layers of lamination.

Both eastern and western processes entail beating material into individual fibers that are ready to bond to one another through hydrogen bonding and with all paper forming, how you do it affects what you get.

Today’s photographs show me rinsing undyed fiber and a classmate rinsing lotus dyed kozo.

One rinses the fiber until the water runs clear so that the color does not bleed on the felts.

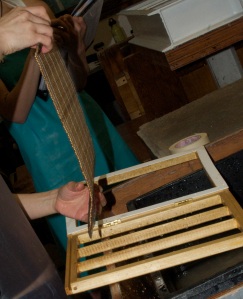
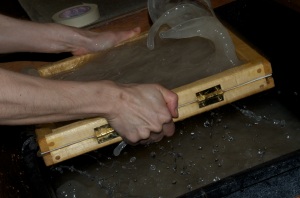
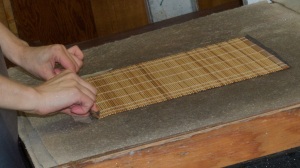
There are also images from the sheet forming process.

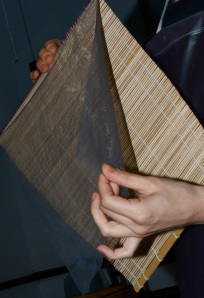
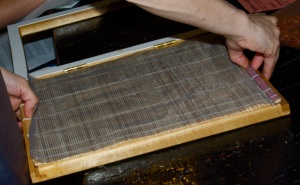
So forming a sheet of kozo goes like this:  The mould has two parts like a screen and deckle but the screen is a bamboo mat like the kind you see used in sushi maki preparation, with a finely woven screen (the grade to keep no-see-ums away) stitch to one end. The mat or “sha” is pinched centered in the frame and held tightly together.

The fiber is put in a vat with water and formation aid which is a clear slimy kind of stuff that enables the fibers to be suspended and layered. One knows the ratio of water, fiber and formation aid are correct by feel and sound as you slap and slosh you hand around the solution.

One starts with 2 or 3 quick shallow but vertical dips of the mould into the vat. Follow that action with a few deeper dips with a rocking motion build layers of fiber, then a quick but delicate fling of excess pulp out of the far end of the mould.

After one builds the desired amount of fiber on the sha, the frame is opened and the mat it held by a corner to drain excess water. Then the mat is turned upside down and placed on a post – ( the pile of paper being made) In western paper, pellon or interweaving separate each layer of pulled paper.

In kozo the fibers bond on the sheet being made but not to the sheets sitting above or below so they are safely stacked directly on top of one another.

threadA find thread is used to mark where the sheets separate and because 6 of us are making paper we put markers between our sheets to identify our paper.

In addition to forming sheets we prepared another dye – this time from logwood bark. Logwood and Brazilwood are trees found in Central America and South America. (another path of research on my want to do list) Te logwood bark is a dark red color and yields a various shade of purple dye depending on the mordant one uses. We made two batches – one with alum mordant and one with iron mordant.

Tomorrow we will continue to form sheets with our newly dyed logwood kozo and we will make an indigo pigmented batch as well and learn some more ornamental sheet forming techniques. This week is flying…

I took advantage of the open studio time Wednesday evening and formed several sheets in white, lotus-dyed yellow and the logwood-dyed kozo that was a smoky grey -purple. At 10 pm Tatiana came back to the studio to start the drying process.
We stacked our wet paper in between felts and boards, piling them on a palette on the floor and placed a 50 gallon pail on top with a hose ticking out water at a very slow rate to build up pressure very gradually .
Because the sheets are couched directly on top of one another, the pressing process nees to be very slow and build gradually.
Thursday morning we dissembled the initial drying system and then put our stacks of paper in the 20 ton press and squeezed more water out.
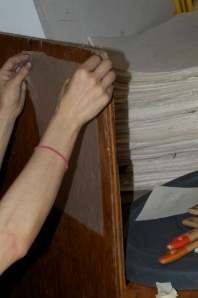
Then we learned how to dry the paper by peeling it carefully off the post and placing each sheet on a board with a brush. This is where the thread that we placed throughout the post helped us locate the edge of a new sheet and facilitated the peeling apart of the post.
The board-mounted paper was  then placed in the sun to dry.
In the afternoon Tatiana showed us some techniques for decorative paper making – using more than one color.
I played in the studio til about midnight and made several sheets of paper.

Friday – our last day. We spent the morning drying work from the previous day and forming as many sheets as possible before lunch. TIme after lunch was devoted to cleaning up.

As I reflect back on the week I am impressed by both the breadth and depth Tatiana Ginsberg designed for the week. She shared images from her travels in Japan and used those slides to launch into descriptions of process and share anecdotes about the art, craft and culture of paper making. She too honored her teachers in Japan by showing us their photographs and telling us their names.

Seeing the work I accomplished and the beautiful paper I made, I appreciated her direct instruction. I also appreciated the instant community she cultivated. We needed to work as a group and for the first two days we all worked with great focus to properly prepare and dye the kozo we each used.
I enjoyed seeing the inner bark of mulberry turn into paper. I enjoyed turning the mulberry bark into paper with my own hands.
I learned that I like diving in to process – it has a calming effect – many steps requiring attention become a sort of meditation requiring presence and attention to detail.
Making things is very important and I plan to keep that idea in mind when I design experiences for my students. I’ve included some photographs of the paper I made in this class.